> For the complete documentation index, see [llms.txt](https://cybermuhdupa.gitbook.io/total-oscp-guide/llms.txt). Markdown versions of documentation pages are available by appending `.md` to page URLs; this page is available as [Markdown](https://cybermuhdupa.gitbook.io/total-oscp-guide/the-basics/basics-of-linux.md).
# Basics of linux
This is a huge chapter. I could divide it up in many subchapters but I like to have it all at one place so I can just do `ctr-f`, and search for whatever I am looking for.
### 1. The Shell - Bash
The shell, or the terminal is a really useful tool. Bash is the standard shell on most Linux distros.
#### Navigating
`pwd` - Print working directory
`cd` - Change directory
`cd ~` - Change directory to your home directory
`cd -` - Go back to previous directory
#### Looking at files
`ls` - List files in directory
`ls -ltr` - Sort list by last modified. -time -reverse
`file` - Show info about file. What type of file it is. If it is a binary or text file for example.
`cat` - Output content of file.
`less` - Output file but just little bit at a time. Use this one. Not `more`.
Use `/searchterm` to search. It is the same command as in vim. `n` to scroll to next search result. Press `q` to quit.
`more` - Output file but just little bit at a time. `less` is better.
#### Working with files
`touch` - Create a new file.
`cp` - Copy
`mkdir` - Make directory.
```bash
# Make entire directory structure
mkdir -p new/thisonetoo/and/this/one
```
`rm` - Remove file
```bash
# Remove recursively and its content. Very dangerous command!
rm -rf ./directory
```
Watch the command destroy an entire machine:
`rmdir` - Remove empty directory
#### A little bit of everything
`history` - Show commands history
`sudo`
List what rights the sudo user has.
```
sudo -l
```
Sudo config file is usually **/etc/sudoers**
#### Finding files
There are mainly three ways to find files on Linux: **find**, **locate**, and **which**.
**Find**
Find is slower than locate but a lot more thorough. You can search for files recursively and with regex and a lot of other features.
```
# This will send all permissions denied outputs to dev/null.
find / -name file 2>/dev/null
```
**Locate**
Locate is really fast because it relies on an internal database. So in order to have it updated you need to run:
```
sudo updatedb
```
Then you can easily find stuff like this:
```
locate filename
```
**Which**
Outputs the path of the binary that you are looking for. It searches through the directories that are defined in your $PATH variable.
```bash
which bash
# Usually outputs: /bin/bash
```
### 2. Editing text
First let's just clear out something about **standard streams**, or **I/O**-streams. Standard streams are the streams that are used to interact between the human computer-user and the machine. There are three standard streams: standard input (stdin), standard output (stdout), and standard error (stderr).The stdin stream can be seen as an abstractions of the real keyboard input. So when you issue a command/program that requires input the program does not read straight from the keyboard input, instead it reads from the file STDIN.
#### Stdin
Stdin is the data that gets inputed into the program. An example of a program that requires stdin data is `cp`. In order for the program to do anything it needs input data. For example `cp file1 copy_of_file1`. Here `file1` and `copy_of_file1` is the stdin.
So the default Stdin comes from the STDIN-file that is a text-file representation of the keyboard input. But often times we do not want to input stuff from the keyboard, sometimes we want to input something into a program that comes from another file. That is when we can use redirection symbol: `>`.
So an example could be `cat < my_text_file.txt`. The data from my\_text\_file.txt will now be used as input instead of the keyboard input.
The file descriptor for **stdin** is: **0**
#### Stdout
Stdout is the data that get ouputed from the program. For example, when you use the command `cat file1` that data/text that gets outputed is the stdout The same with the program `ls`. Not all programs have stdout. For example when you use `mv` or `cp` successfully you get no stdout back from the program.
The stdout can be redirected to another file by using these symbols `>` and `>>`. So now we can do the following:
```
ls > result_of_ls.txt
# now the result will be written to the file result_of_ls.txt
ls >> result_of_ls.txt
# This will append the data to the bottom of the file result_of_ls.txt
```
Another incredibly useful feature is the **pipe** feature, reprsented with this symbol `|`. It will take the stdout and redirect it into another program. Here is an example:
```bash
ls -la | less
```
This will take the stdout from `ls -la` and forward/redirect it into the `less` program. Using the **pipe** you can now chain different commands.
The file descriptor for **stdout** is: **1**
#### Stderr
Stderr is the stream used for outputting error messages. So if a program fails for whatever reason. For example, if we try to copy a file that does not exist, this will be the stdrr output:
```
cp thisfiledoesnotexist aaaaaaaaaa
cp: cannot stat 'thisfiledoesnotexist': No such file or directory
```
This is a common way for stderr to present itself, just straight out into the terminal. But sometimes stderr gets sent to a log file.
Stderr is useful because with it we can separate between **stdout** and **stderr**. However, to the eye it might be difficult to distinguish what output is **stdout** and what output is **stderr**.
One easy way to determine is the output is **stderr** or **stdout** is to simply redirect it into a file. Because by default you only redirect **stdout**, and not **stderr**.
```bash
cp thisfiledoesnotexist aaaaaaaaaa > result.txt
cp: cannot stat 'thisfiledoesnotexist': No such file or directory
# If we now look at result.txt we will find that it is empty. Since the error-text we recieved could not be redirected into the textfile, since it is stderr and not stdout.
```
#### Filters
There are certain programs that are especially useful to use together with pipes. They can also be used as stand-alone programs but you will often see them together with pipes.
`sort`
```
sort test.txt
```
`uniq`
```
sort -u test.txt
sort test.txt | uniq
cat filename | sort -u > newFileName
```
`grep`
`head`
`tail`
`tr`
`sed`
#### Editing text
**sed**
Can perform basic editing on streams, that is to say, text.
Remove first line of file/stream
```
sed "1d"
```
**cut**
Cut by column
This is a useful command to cut in text.
Let's say that we have the following text, and we want to cut out the ip-address.
```
64 bytes from 192.168.0.1: icmp_req=1 ttl=255 time=4.86 ms
```
```
cut -d" " -f4
```
`-d` stands for delimiter. and `-f` for field.
**tr - Translate**
Transform all letter into capital letters
```
tr "[:lower:]" "[:upper:]" < file1 > file2
```
Example\
Remove character
```
# Remove characters
cat file.txt | tr -d "."
# Remove and replace
# Remove all dots and replace them with underscore.
cat file.txt | tr "." "_"
```
**awk**
So awk is an advanced tool for editing text-files. It is its own programming language to it can become quite complex. Awk iterates over the whole file line by line.
This is the basic structure of an awk command
```
awk '/search_pattern/ { action_to_take_on_matches; another_action; }' file_to_parse
```
The search pattern takes regex.\
You can exclude the search portion or the action portion.
This just prints every line of the file.
```
awk '{print}' filename
```
Filtering out specific ip-address:
```
awk '/172.16.40.10.81/' error.log
```
Now we want to print out the fourth column of that file, we can just pipe this to cut, but we can also use awk for it, like this:
```
awk '/172.16.40.10.81/ {print $4}' error.log
# Another example
awk '{print $2,$5;}' error.txt
This prints columns 2 and 5.
```
We can use the -F flag to add a custom delimiter.
```
awk -F ':' '{print $1}' test.txt
```
So if you are manipulating some text you might want to start the output with some info about the columns or something like that. To do that we can use the BEGIN-keyword.
```
awk 'BEGIN {printf "IP-address \tPort\n"} /nop/ {print $3}' test.txt | head
awk 'BEGIN{printf "IP-address \tPort\n"} /nop/ {print $3} END {printf "End of the file\n"}' test.txt | tail
```
Here we are printing IP-address PORT to the first line of the file.
### 3. User management
To add a user we do:
```
adduser NameOfUser
# On some machines it is
useradd nameOfUser
```
To add user to sudo-group:
```
adduser NameOfUser sudo
```
On some machines we might not be able to edit the sudoers file because we don't have an interactive shell, in this case can you can just redirect the text into the file, like this:
```
echo "username ALL=(ALL) ALL" >> /etc/sudoers
```
Check which users are in the sudo group:
```
cat /etc/group | grep sudo
```
Switch user in terminal:
```
su NameOfUser
```
Remove/delete user:
```
sudo userdel NameOfUser
```
### 4. Permissions
```
ls -la
```
Shows all the files and directories and their permission settings.
```
drwxrwxrwt 2 root root 4,0K ago 3 17:33 myfile
```
Here we have 10 letters in the beginning. The first one `d` shows that it is a directory.\
The next three letters are for read, `w` for write and `x` for execute. The first three belong to the owner, the second three to the group, and the last three to all users.
### 5. Processes
To display information regarding the systems processes you can use the `ps` command.
```
ps -aux
```
`-a` stands for all `-u` stands for all processes by all users `-x` stands for all processes that don't run a `tty`
If you run this command you will probably see a pretty big output. In the column for **command** you will see what command has been run. Every process has a Process Identification Number (**PID**). Something you will also see in the output.
All of theses processes can actually be found in `/proc`. You just go to `/proc/[pid]`. In `/proc` you can find information about the system, and you can actually change the system if you change those files! But more on that later. What I wanted to explain is that if we look at the output from `ps` we see that some commands are in brackets. Like this:
```
root 10 0.0 0.0 0 0 ? S ene14 0:00 [watchdog/0]
root 11 0.0 0.0 0 0 ? S ene14 0:00 [watchdog/1]
root 12 0.0 0.0 0 0 ? S ene14 0:00 [migration/1]
root 13 0.0 0.0 0 0 ? S ene14 0:00 [ksoftirqd/1]
```
Those are usually kernel processes, and you can safely assume that no user has started them.
If you want to monitor processes in real time you can use `top` or `htop`. `top` comes preinstalled on most distros. But `htop` is really a lot nicer.
For `htop` the F1-10 keys might trigger OS-events. So you can use the shortcuts instead.
```
Shortcut Key Function Key Description
h F1 Invoke htop Help
S F2 Htop Setup Menu
/ F3 Search for a Process
I F4 Invert Sort Order
t F5 Tree View
> F6 Sort by a column
[ F7 Nice – (change priority)
] F8 Nice + (change priority)
k F9 Kill a Process
q F10 Quit htop
```
### 6. Packages
Something that difference Linux from windows is how it handles installing new software. In windows you usually have to google around and then click on random scary download buttons that might fuck up your computer, or not. It's like a constant lottery where you win by no installing malware. In Linux that is usually not really an issue. That is because distros have their own software repositories from where you can download your software. This is kind of like an app-store except everything is free.
The different major branches of teh GNU/Linux OS have their own software repositories. Ubuntu has their own, debian has their own, and so on.
Different distros also have their own package-amangers. For example, Debian and ubuntu uses `apt`, while Redhat uses `rpm`, and Arch uses `pacman`. You should strick to your own package-manager, because even though chaning package-manager is possible it will probably just cause you more headache than benefits.
#### Install package
Example of how to install something with apt:
```
sudo apt-get install nmap
```
If you only have a .deb file you do this to install from the terminal:
```
sudo dpkg -i /path/to/deb/file
```
```
sudo apt-get install -f
```
#### Remove packages
This can be tricky. First find the package
```
dpkg --list
```
Then you find it in your list.
```
sudo apt-get --purge remove nameOfProgram
```
When you remove some package it might have requires some other dependencies. To remove those you run
```
sudo apt-get autoremove
```
#### Organizing your $path variable
I am talking about debian/ubuntu here. On other systems I don't know.
You can define your path in `/etc/environment`. If you don't have it you can create it and add the path like this:
```
source /etc/environment && export PATH
```
If you are using zsh (which you should) you have to add it here
```
sudo vim /etc/zsh/zshenv
```
And add this line somewhere:
```
source /etc/environment
```
#### Adding a path
This is a non-persistent way to add binaries to your path. Might be useful if you have entered a system that has limited binaries in the path.
```
export PATH=/usr/local/sbin:/usr/local/bin:/usr/sbin:/usr/bin:/sbin:/bin
```
#### Installing custom packages
If you download a package that is not in the official repository you can put the binary in `/opt`. That is good place to put your binaries.
Now you need to add that path to your path-variable. Remember how we set that in `/etc/environment`. So now open up that file and add `/opt` to it, so i looks like this.
```
PATH="/usr/local/sbin:/usr/local/bin:/usr/sbin:/usr/bin:/sbin:/bin:/usr/games:/usr/local/games:/opt"
```
I always add custom binaries last. That means that if we have two binaries with the same name the machine will first select the original binary. This way you won't have to fear screwing up, by accidentally creating a new `ls` binary for example.
### 7. Cronjobs
There are two ways to configure cronjobs. The first one is by putting scripts in the following folders.
```
/etc/cron.daily
/etc/cron.hourly
/etc/cron.weekly
/etc/cron.monthly
```
The second way is to write the command in the crontab
```
# list cronjobs
crontab -l
# Edit or create new cronjobs
crontab -e
```
### 8. Devices
List all devices
```
fdisk -l
```
### 9. The Filesystem
#### The Filesystem Hierarchy Standard
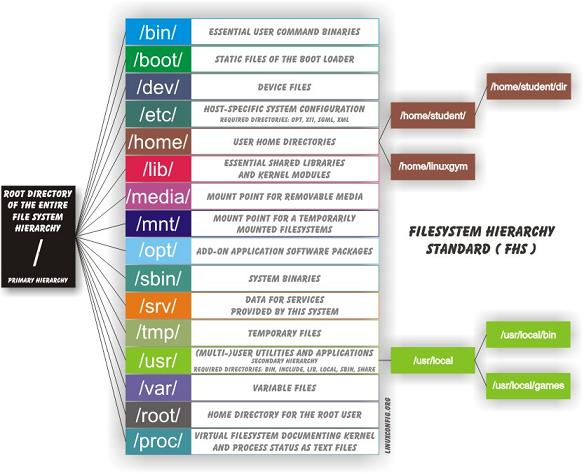\
This image is copied from here:
**Difference between sbin and bin**
sbin is system binaries. A normal user do not have access to these binaries. It is only root and users with sudo privileges that do.
```
pelle@mymachine:/bin$ ls -la /bin
total 4092
drwxr-xr-x 2 root root 4096 2012-02-04 19:12 .
drwxr-xr-x 21 root root 4096 2012-02-06 18:41 ..
--snip--
-rwxr-xr-x 1 root root 27312 2008-04-04 02:42 cat
-rwxr-xr-x 1 root root 45824 2008-04-04 02:42 chgrp
-rwxr-xr-x 1 root root 42816 2008-04-04 02:42 chmod
-rwxr-xr-x 1 root root 47868 2008-04-04 02:42 chown
-rwxr-xr-x 1 root root 71664 2008-04-04 02:42 cp
-rwxr-xr-x 1 root root 110540 2007-11-13 05:54 cpio
-rwxr-xr-x 1 root root 79988 2009-03-09 09:03 dash
-rwxr-xr-x 1 root root 24684 2008-04-04 02:42 echo
-rwxr-xr-x 1 root root 40560 2008-02-29 02:19 ed
-rwxr-xr-x 1 root root 96440 2007-10-23 16:58 egrep
-rwxr-xr-x 1 root root 22192 2008-04-04 02:42 false
-rwxr-xr-x 1 root root 5740 2008-02-06 17:49 fgconsole
-rwxr-xr-x 1 root root 53396 2007-10-23 16:58 fgrep
-rwxr-xr-x 1 root root 8796 2007-11-15 13:01 hostname
```
We have echo, cp, grep. The normal stuff a user needs.
In sbin we have binaries that control the system.
```
ls -la /sbin
total 5884
drwxr-xr-x 2 root root 4096 2012-02-04 10:01 .
drwxr-xr-x 21 root root 4096 2012-02-06 18:41 ..
-rwxr-xr-x 3 root root 23840 2008-03-27 13:25 findfs
-rwxr-xr-x 1 root root 20020 2008-03-27 13:25 fsck
-rwxr-xr-x 1 root root 15168 2008-09-26 08:43 getty
-rwxr-xr-x 1 root root 375 2009-12-10 10:55 grub-install
lrwxrwxrwx 1 root root 6 2012-02-04 09:51 halt -> reboot
-rwxr-xr-x 1 root root 69228 2008-03-28 18:26 hdparm
-rwxr-xr-x 1 root root 31620 2008-09-26 08:43 hwclock
-rwxr-xr-x 1 root root 61808 2007-12-13 05:51 ifconfig
-rwxr-xr-x 2 root root 27372 2007-09-19 20:25 ifdown
-rwxr-xr-x 2 root root 27372 2007-09-19 20:25 ifup
-rwxr-xr-x 1 root root 89604 2008-04-11 09:50 init
-rwxr-xr-x 1 root root 47448 2008-01-28 08:49 ip6tables
-rwxr-xr-x 1 root root 51680 2008-01-28 08:49 ip6tables-restore
-rwxr-xr-x 1 root root 51644 2008-01-28 08:49 ip6tables-save
-rwxr-xr-x 1 root root 10948 2007-12-13 05:51 ipmaddr
-rwxr-xr-x 1 root root 47480 2008-01-28 08:49 iptables
```
#### Mount
So everything on the linux-filesystem belongs to some part of the filesystem-tree. So if we plug in some device we need to mount it to the filesystem. That pretty much means that we need to connect it to the filesystem. Mount is like another word for connect.
So if you want to connect a CD-rom or USB to your machine. You need to mount it to a specific path on the filesystem.
So if you plug in the usb it might be accessible at **/dev/usb**. But that it not enough for you to be able to browse the usb content. You need to mount it. You do this by writing
```
mount /dev/usb /media/usb
```
Or whereever you want to mount it.
So when you click on Eject or Safetly remove you are just unmounting.
```
umount /media/usb
```
Knowing how to mount and unmount might be useful if you want to get access to a remote NFS-directory. You will need to mount it to your filesystem to be able to browse it.
### 10. Controlling services
#### Systemctl
Systemctl can be used to enable and disable various services on your linux machine.\
Start ssh
```
systemctl start ssh
systemctl status ssh
systemctl stop ssh
```
You can verify that the service is listening for connection by running network status.
```
netstat -apnt
```
Make ssh start upon boot
```
systemctl enable ssh
systemctl enable apache2
```
#### Init.d
Init.d is just a wrapper around Systemctl. I prefer it.
```
/etc/init.d/cron status
/etc/init.d/cron start
/etc/init.d/cron stop
```
#### rcconf
This is a tool to control services more easily, what is running upon boot and so on.
### 11. Kernel
The Kernel is responsible for talking between the hardware and the software, and to manage the systems resources.
The Linux Kernel is a monolithic kernel, unlike the OSX and the Windows kernels which are hybrid.
You can find the kernel file in `/boot`. It might look like something like this`vmlinuz-4.4.0-57-generic`. In the beginning of time the kernel was simply called `linux`. But when Virtual Memory was introduced they changed the name to `vmlinux` to reflect that the kernel could handle virtual memory. When the kernel later became too big it was compressed using zlib , therefore the name was changed to `vmlinuz`.
The Linux Kernel differs from Windows in that it contains drivers by default. So you don't have to go around looking for drivers like you do on windows when you want to install a printer, or something like that.
It is really easy to upgrade to the latest Linux kernel, all you have to do tis this:
```bash
sudo apt-get update && sudo apt-get dist-upgrade
# or
sudo apt-get update && sudo apt-get upgrade
```
If you are using a distro that is Long Term Supported (LTS). You will not get the latest Kernel version, but you will get the latest Long Term Supported version.
### 14. Logging
Logs can be viewed here on debian distros `/var/log/`
### 16. Network basics
#### Netstat - Find outgoing and incoming connections
Netstat is a multiplatform tool. So it works on both mac, windows and linux.
```
$ netstat -antlp
Proto Recv-Q Send-Q Local Address Foreign Address State PID/Program name
tcp 0 0 mymachine:domain *:* LISTEN -
tcp 0 0 localhost:ipp *:* LISTEN -
tcp 0 0 localhost:27017 *:* LISTEN -
tcp 0 0 localhost:mysql *:* LISTEN -
tcp 0 0 192.168.0.15:44013 ec2-54-85-27-14.c:https ESTABLISHED 6604/slack --disabl
tcp 0 0 192.168.0.15:51448 ec2-50-16-193-3.c:https ESTABLISHED 3120/chrome
tcp 0 0 192.168.0.15:43476 104.27.152.203:https TIME_WAIT -
tcp 0 0 192.168.0.15:59380 149.154.175.50:https ESTABLISHED 5068/Telegram
tcp 0 0 192.168.0.15:53840 149.154.175.50:http ESTABLISHED 5068/Telegram
tcp 0 0 192.168.0.15:47158 176.32.99.76:https ESTABLISHED 3120/chrome
tcp 0 0 192.168.0.15:47161 176.32.99.76:https ESTABLISHED 3120/chrome
tcp 0 0 localhost:27017 localhost:44196 ESTABLISHED -
tcp 0 0 192.168.0.15:46910 a104-114-242-25.d:https ESTABLISHED 3120/chrome
tcp 0 0 localhost:44196 localhost:27017 ESTABLISHED 6903/node
tcp 0 0 192.168.0.15:36280 cb-in-f101.1e100.:https ESTABLISHED 3120/chrome
tcp 0 0 192.168.0.15:47160 176.32.99.76:https ESTABLISHED 3120/chrome
tcp 0 1 192.168.0.15:59285 149.154.175.50:https LAST_ACK -
udp 0 0 *:35733 *:* -
udp 0 0 mymachine:domain *:* -
udp 0 0 *:bootpc *:* -
udp 0 0 *:33158 *:* -
udp 0 0 *:ipp *:* -
udp 0 0 *:mdns *:* 3120/chrome
udp 0 0 *:mdns *:* 3120/chrome
udp 0 0 *:mdns *:* -
udp 0 0 192.168.0.15:55065 ce-in-f189.1e100.:https ESTABLISHED 3120/chrome
```
A few interesting things to observe here is that my machine is using any port over 1024 to connect to the outside. So it is not like just because we communicate with https and connect to port 443 that we use that port on our machine. On our machine it can be any port (over 1024) and usually any port over 10000.
Find out what services are listening for connection on your machine\
Flags
```
-a # All
-n # show numeric addresses
-p # show port
-t # tcp
```
```
netstat -anpt
```
To easily check out what process is using lots of bandwidth you can use nethogs.
```
sudo apt-get install nethogs
nethogs
```
Or you can use tcpdump, or iptables.
Every listening process of course has a PID, but unless you are root you can't might not see them all.
#### Firewall - Iptables
Iptables is a firewall tool in linux. A firewall is basically a tool that scans incoming and/or outgoing traffic. You can add rules to the iptables to filter for certain traffic.
**Types of chains**
So you can filter traffic in three different ways **input**, **forward**, and **output**. These are called three different chains.
**INPUT**\
This is for incoming connections. If someone wants to ssh into your machine. Or a web-server responds to your request.
**FORWARD**\
This chain is used for traffic that is not aimed at your machine. A router for example usually just passes information on. Most connections are just passing through. As you can see this will probably not be used so much on your machine, as a normal desktop or a server doesn't router that much traffic.
**OUTPUT**
This chain is used for outgoing traffic.
**Active rules**
To view your active rules you do
```
iptables -L
# It will output something like this
Chain INPUT (policy ACCEPT)
target prot opt source destination
Chain FORWARD (policy ACCEPT)
target prot opt source destination
Chain OUTPUT (policy ACCEPT)
target prot opt source destination
```
So as we can see the current policy is to accept all traffic in all directions.
If you for some reason has been tampering with the iptables and maybe fucked up. This is how you return it to the default setting, accepting all connections
```
iptables --policy INPUT ACCEPT
iptables --policy OUTPUT ACCEPT
iptables --policy FORWARD ACCEPT
```
If you instead want to forbid all traffic you do
```
iptables --policy INPUT DROP
iptables --policy OUTPUT DROP
iptables --policy FORWARD DROP
```
Okay, so let's block out some connections. To do that we want to add/append a new rule. We want to block all connections from our enemy 192.168.1.30.
```
# A for append, and S for source.
iptables -A INPUT -s 192.168.1.30 -j DROP
# Block an entire range
iptables -A INPUT -s 192.168.1.0/24 -j DROP
```
Now if we want to see our current rules we just do
```
iptables -L
```
And we can now see our new rule.
To add line-numbers for each rule, so that you can then specify which rule you want to reset or change or something you can output the rluels with line-numbers
```
iptables -L -v --line-numbers
```
**Remove/delete a rule**\
To remove a rule you just do
```
# Remove one specific rule
iptables -D INPUT 2
# Remove all rules
iptables -F
```
**Save your changes**\
Your changes will only be saved and therefore in action until you restart iptables. So they will disappear every time you reboot unless you save the changes. To save the changes on ubuntu you do
```
sudo /sbin/iptables-save
```
**Measuring bandwidth usage**
There are a few different tools in hour arsenal that we can use to measure bandwidth usage. We will start with iptables.
To view the input and output traffic we just list the rules with some verbosity.
```
iptables -L -v
# Stdout
Chain INPUT (policy ACCEPT 6382 packets, 1900K bytes)
pkts bytes target prot opt in out source destination
Chain FORWARD (policy ACCEPT 0 packets, 0 bytes)
pkts bytes target prot opt in out source destination
Chain OUTPUT (policy ACCEPT 4266 packets, 578K bytes)
pkts bytes target prot opt in out source destination
```
So clean this up and reset the count we can do the following
```
# Restar the count
iptables -Z
# Remove all the rules, FLUSH them
iptables -F
```
So now we just need to add our rules. A simple script for this would be
```
#!/bin/bash
iptables -F
iptables -I INPUT 1 -p tcp -j ACCEPT
```
Then check out the traffc with
```
iptables -L -v --line-numbers
```
**Examples**
**Block outgoing connections to a specific ip**
```
iptables -A OUTPUT -d 198.23.253.22 -j DROP
```
#### Troubleshooting
**Have you tried turning it on and off?**
I have had problems with the network-adapter not starting or something like that, on Ubuntu. You can try to restart the network manager if this happens:
```bash
sudo service network-manager restart
```
**Magical rfkill**
If for some reason the wifi is blocked you can unblock it (or block it) with rfkill.
```
$ rfkill list
0: phy0: Wireless LAN
Soft blocked: no
Hard blocked: no
2: hci0: Bluetooth
Soft blocked: no
Hard blocked: no
```
To block or unblock the **phy0** from the example above you do:
```
# Block
rfkill block 0
# Unblock
rfkill unblock 0
```
If there is a **hard block** it means that there is a physical switch on you machine that you need to switch off.
### 17. Subnetting
### 18. Routing
### 21. DNS
### References
\